I was just checking my planner and noticed that upcoming Thursday a miracle is going to happen  After day’s of being “tired” I will switch overnight to “very fresh”.
Shouldn’t there at least one “fresh” day in between?

I’m not sure “should” particularly matters. You trained today. Kudo’s to you since I despise 20 minute intervals! When would you expect to feel fresh? Try nudging your fitness feel slider to achieve that level of freshness. Try it for a few days and see if it feels better for you? I literally had to only adjust my slider from 0 to 3 to make the planner better match how I felt. For context, 60 clicks either way is possible.
1 Like
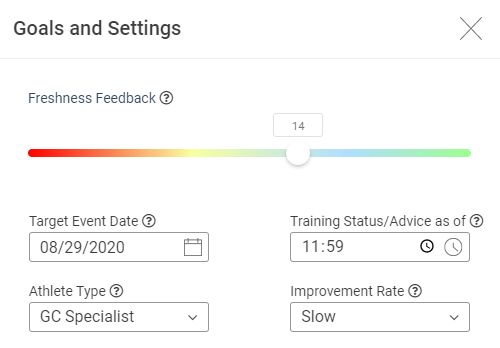
Thanks Steve. I am already fiddling around with the slider for a while and it is pretty accurate now to how I feel. Slider is currently set to +14.
It is just that I would have expected it to goto “Fresh” first because it seems more natural. Especially when you are tired for multiple days in a row.
p.s. Thanks for the kudoos! 
If it makes you feel any better, the same miracle here  It’s probably a combination of your slider setting (mine is at -10) and your TL over the (x days) before it, plus your planned workouts (i.e. none).
FYI and FWIW: my ‘training status/advice as of’ is set to 17:00, because I do not train in the evening. This may also have an influence.

1 Like
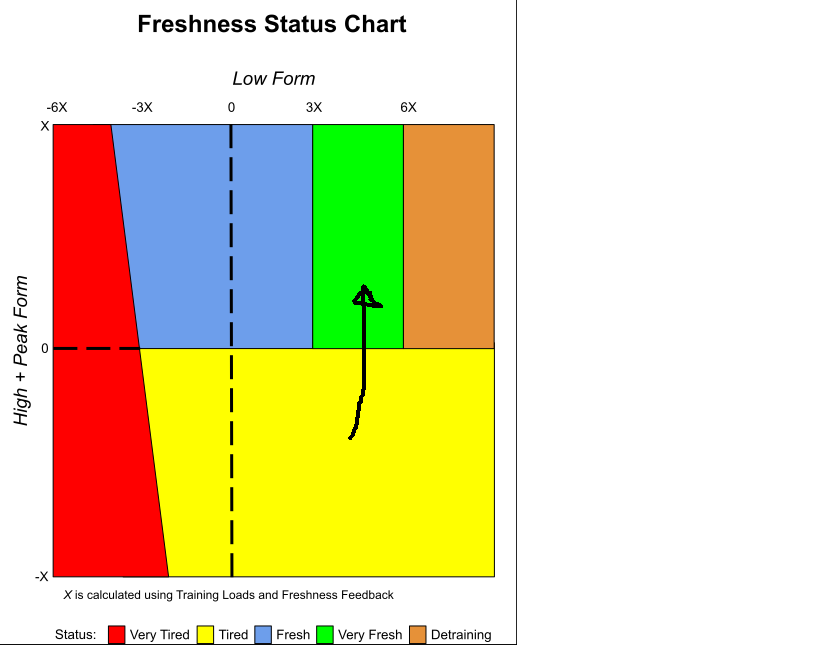
I think this chart may help…
If you are yellow it’s because of negative form on peak / HIE strain, not due to low strain form… so you could otherwise have been blue already, if not for the peak / hie form… so if you then have a few days off you can end up with a very positive low form (green) by the time your peak / hie recovers… (as you recover you move up and to the right of the chart)
1 Like
1 Like
The OP was wondering why he would go from tired to very fresh, without a transition through fresh. The math may explain the colors, but I’m pretty sure you’ll have to provide more detail to explain how that jump-over happens.
And as you can see, I jump from green to brown the next day., i.e. from tired to detraining in two days.
Then again, I hardly ever look at the color - I know when I’m tired or fresh and I never plan anything ahead, not using the planner anyway.
1 Like
OK, see the pic posted by @johanbarelds (thanks for artistry!) which illustrates the movement from yellow into green… if you continued the line at an angle it could potentially go into brown quite quickly thereafter
1 Like
I did some check’s by scheduling some “low strain” workouts in future:
Current:

With 2 days low strain workout in upcoming days:

Notice that the Form changed from “Very Fresh” to “Fresh” for upcoming Friday.
If I look at the graph this makes perfectly sense. For Tuesday and Wednesday only Low Strain is added which reduces the Low Form status from “Very Fresh” to “Fresh”.
At the same time the High + Peak Form is recovering since there is no High or Peak Strain in the scheduled workouts.
So, the angle can be computed? I guess my TL of 200+ may be an outlier here…
Short answer is yes but need to defer to @ManofSteele for the details as it’ll be linked to recovery load constants… with the default you recover 2.5 times faster for peak / high than you do for low strain… but then the X and Y axes of the charts are not to the same scale (% of TL)… would just trust the planner predictions personally
I guess with a very high TL it’s harder to get into the really tired status, and you can recover more quickly… though it will depend on how high your peak / high training loads are as well…?
I tried fiddling with the training and recovery load time constants, but my knowledge is too limited to get that to make any sense.
Most of my training is sweet spot, or Z3 and Z4 - lots of low strain, but do that twice a day and it adds up. So, high/peak strain and stress do not amount to much in my book, other than during the occasional hard day.
Also don’t feel comfortable playing with those constants so just leave as is
Low high / peak TL would be why you easily go into yellow after some high intensity… I have the same when I move from base to build to peak (can take a week or sometimes more to move from yellow back to blue)
Yellow is not an issue as you know - just means limit the high intensity, but you can still do hard base rides
Hi all… posted this a while back. I think it might be helpful for users:
1 Like
Thanks Scott! It’s clear to me now.
There is just one thing I didn’t really comment in that post above, which I wish I would have added…
How far the white dot in the above example is going to move depends on two factors: a) the XSS of the activity/activities and b) the starting training loads at the start of the activity.
For example… Let’s suppose two athletes are both at the exact same form (the white dot above), but one has a TL of 125 and one has a TL of 25. If both athletes do 100 low XSS (0 high/peak to simplify things), the athlete with a TL of 125 will move relatively less than the athlete with a TL of 25. This is why athletes with very high training loads (4.5+ stars) return from yellow/red status back to blue/green status so quickly, even after rides of 200+ XSS.
Hope that makes sense.
2 Likes
Now it does ![]()